
Designing notebooks- A peek at my process 👀

Hello dears and welcome to a new blog article 💙
Today I would like to share with you the process behind a beautiful project I had the chance to work on in December 2021 : designing a set of notebooks for the french brand Djeco ! The notebooks just came out a few weeks ago and I received my samples, and thought it could be nice to share some behind-the-scenes with you here 😊
1 - The brief
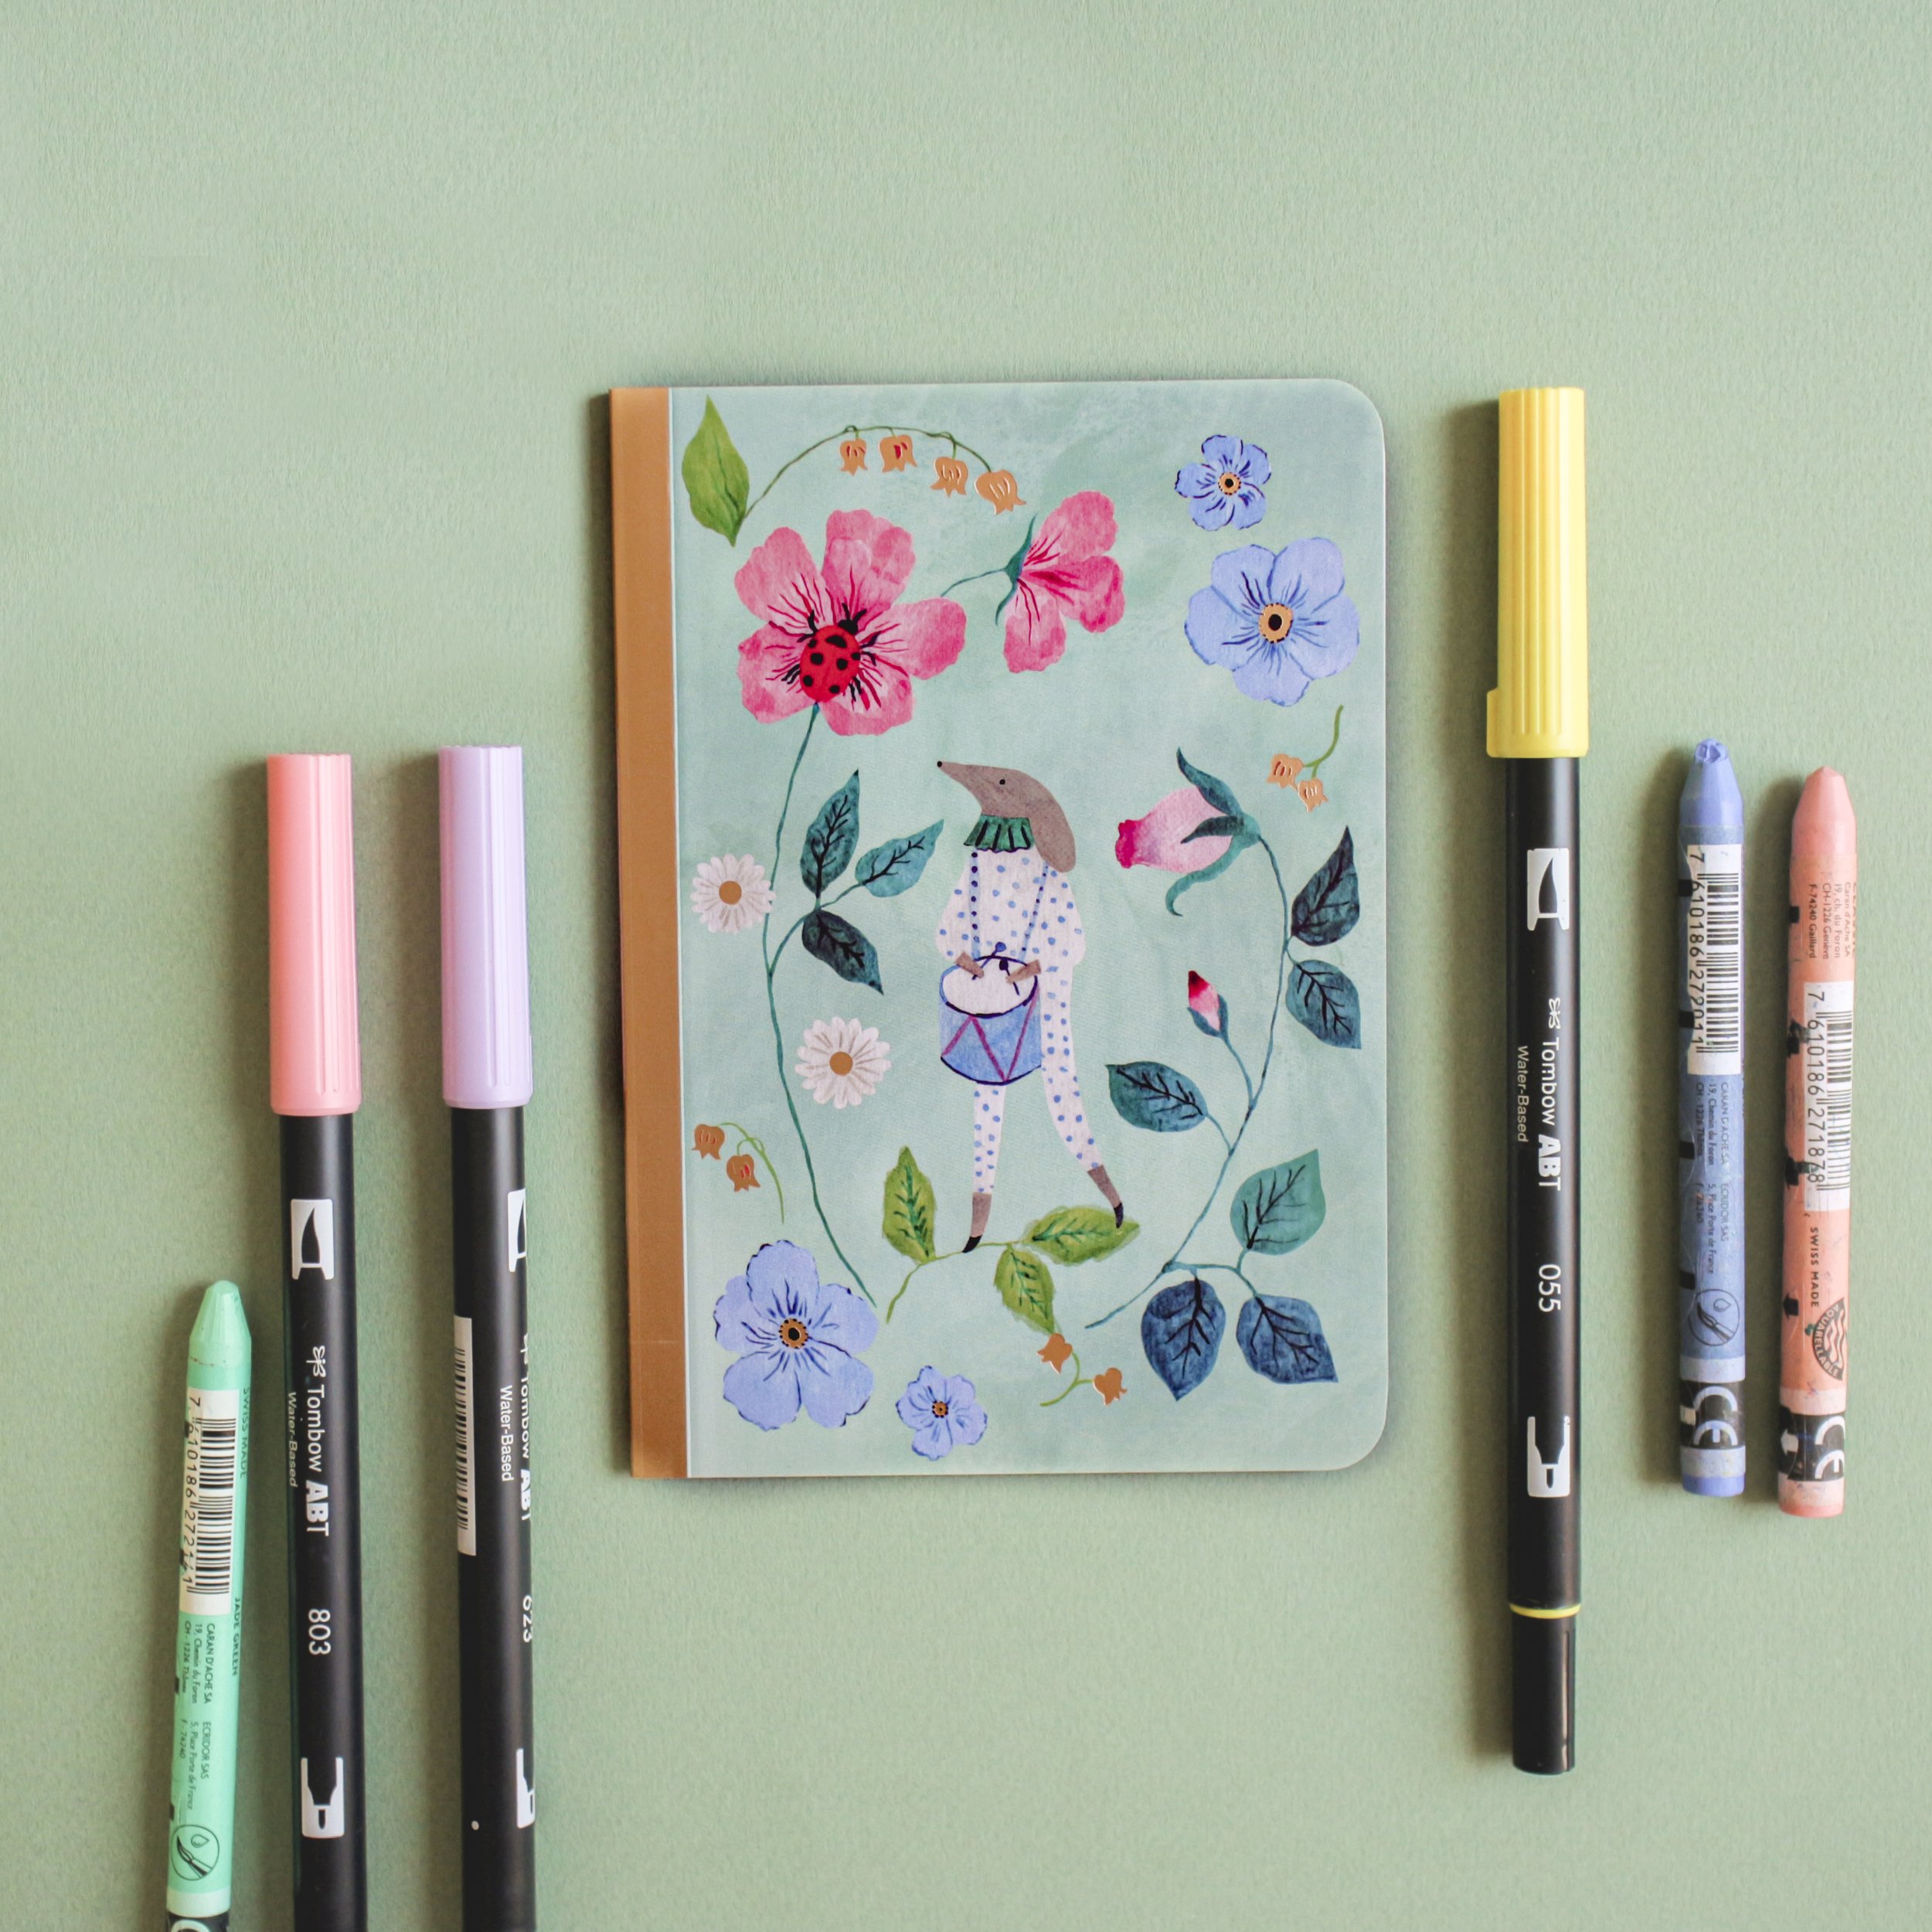
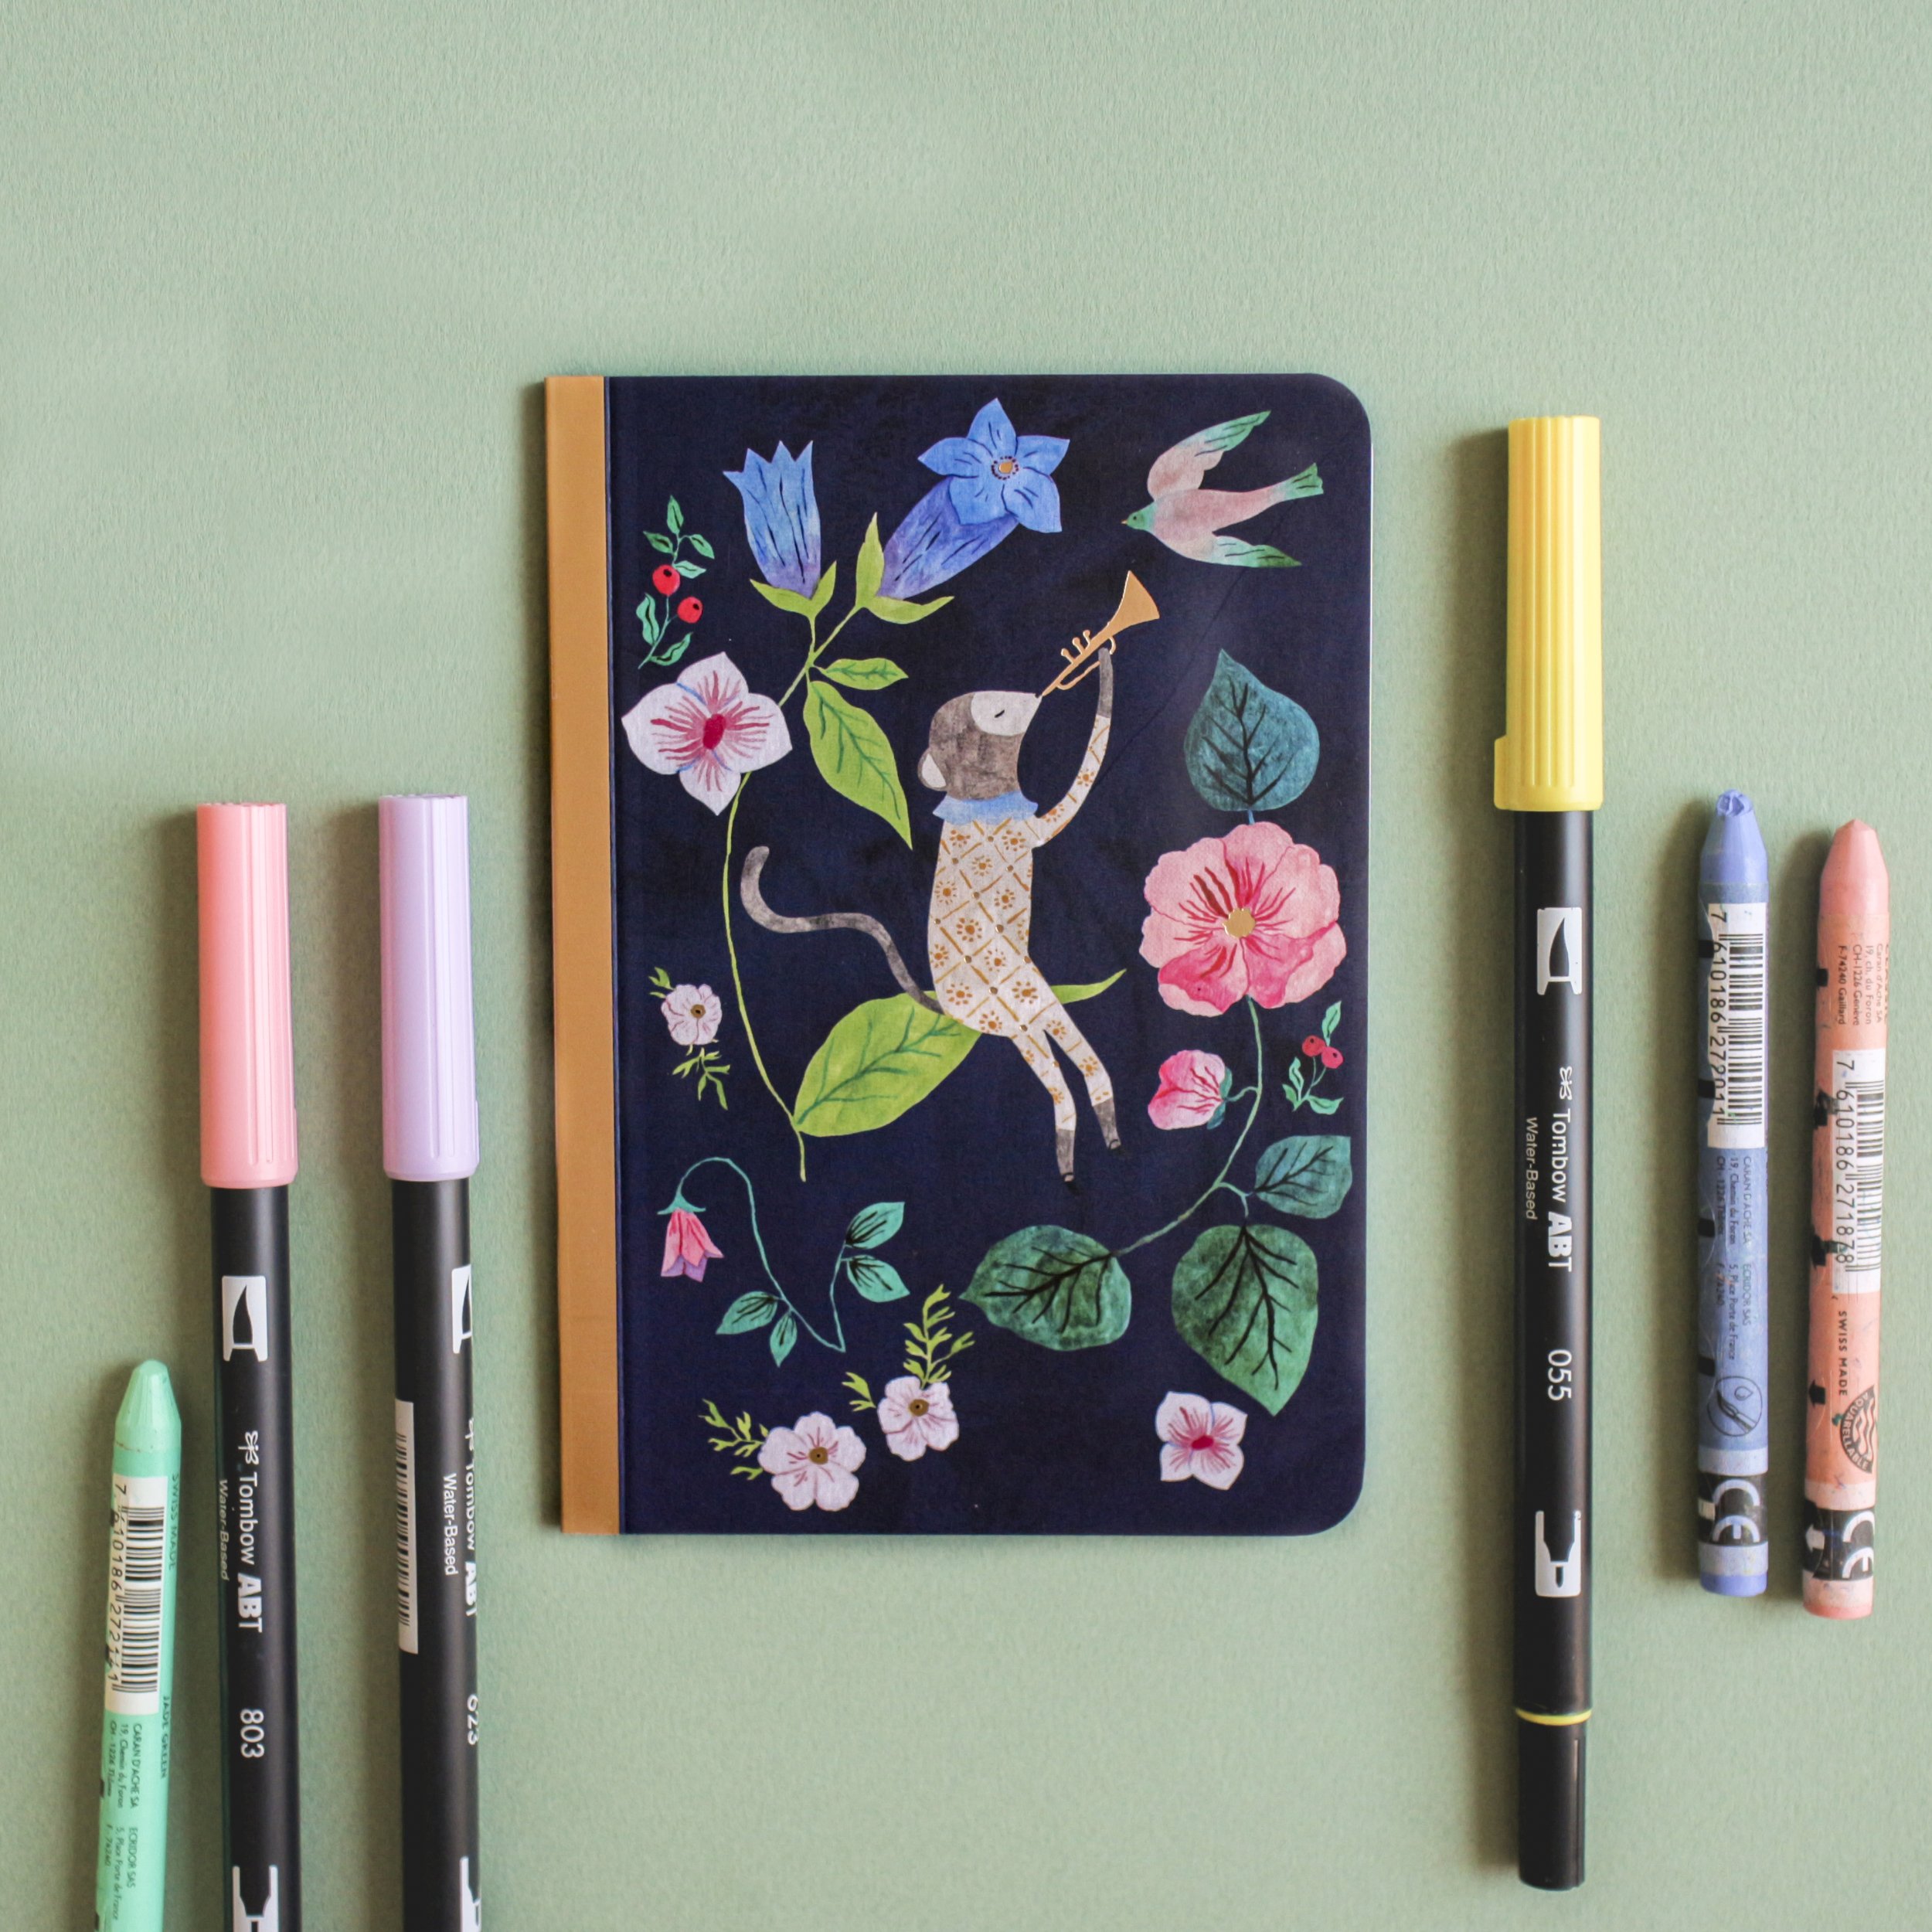
Djeco asked me to illustrate a set of two A6 sized notebooks (one would be blank and another ruled), and a bigger one, around A5 sized. The brief included a full illustration for the cover, a spot illustration for the back, a pattern for the inside covers and another spot illustration to be printed on the pages 🌼
I had worked with Djeco earlier the same year, illustrating other paper goods (hopefully I will also share that with you soon), and I had worked digitally for this first project (it was the first client work I illustrated on the iPad !). But for this new project, I envisioned something in watercolour, with vibrant colours and beautiful brush textures 💙 So the artistic director and I decided to move forward in this direction, and it was time to start working on the first sketches!

2 - The first sketches
I started sketching in pencil, drawing random little elements in a sketchbook. This is how I always try to start a new project : taking some quiet time, with no pressure, trying to create an atmosphere to feel as cozy and safe as possible (I love lighting a candle and making some warm tea). I try to shut the outside world off and soak into the feeling and atmosphere I have in mind for the new project. And even when this atmosphere is not clear yet, I let myself be free and doodle whatever comes through my mind, even if it seems silly or irrelevant at the time. I try to just go with the flow without judging what I am drawing or how I am drawing it.

After that, I can let it sit for a day or two, and come back to it. It becomes easier to take a step back and see which ideas or elements can really work and represent the feeling I want to transmit best. After choosing the ideas I like the most, I try to make a refined sketch, this time really thinking of the format and requirements of the project (in this case, two A6 and one A5 sketchbooks).


Here are the sketches I sent for the two small notebooks. I sketched the front covers, the spot illustrations for both the back cover and the pages, and included a pattern I had created some months ago to show the art director the feeling I wanted to give to it, just to see if she approved.
She liked both of my propositions and we decided to move forward to colour tests already !
3 - Colour tests
But while the process for the two small notebooks went very smoothly, we were a bit more confused about the big one. At first, I simply sent a digital colour test of a design I had in mind. At first, I thought the big notebook was independant from the set of the two small ones, and decided to create something rather different. But later, we decided to change the direction and make something more similar to the smaller ones, so that it could have the feel of a tiny collection.

This is the first rough colour sketch I submitted for the bigger notebook
I don’t always do this, it really depends on the type of project I am working and how the process is going, but for this specific project, I decided to go ahead and make a digital colour test for the small notebook covers as well, because I wanted to use the same colour palette for both, but I did not want them to feel too similar. So I tried to juggle light and dark shades, bright colours and more peaceful ones, to have a balance that would allow me to create two designs that would both look different and cohesive. This is why I decided to create a light background and a dark one, thinking they would compliment each other well while creating a sense of variety as well as different atmospheres.

The colours for the small notebooks were approved immediately (everything went so smoothly for them), while we still had to figure out the design of the bigger notebook cover. It seemed easier to go ahead with the big notebook as well and paint elements at the same time as I was doing it for the small ones, because it would all look more cohesive. So we quickly settled on an idea through email, and I then went ahead and started the best part : watercolour painting ! 🥰
4 - Painting the elements in watercolour
When working on a deadline, I try to simplify my process in order not to feel overwhelmed, and usually paint all of the elements of a design separately, so that I can scan them and import them in Photshop later, and work on the final composition like a puzzle. It makes small adjustments easier, and if my client gives me some feedback and asks for a few modifications, I am able to do it more quickly and efficiently than if I had a big block of paint to separate and adjust. So this is what I did for this project as well, and I started painting everything following my colour sketches 🌞


The process to paint these elements has been a little different than usual. Indeed, I usually like to paint without pencil sketches, since I find the result is often more spontaneous and I like it much better ! But for this project, since I had already prepared such a detailed sketch and composition for each design, I wanted to follow it as much as possible. So before painting, I traced my sketches lightly on my watercolour paper using a lightbox. I only drew the outline of the shapes and did not draw the details. This way, I could make sure to respect the composition I had planned, while still keeping some spontaneity inside of it !
And, remember : we still had to figure out what the big notebook would look like ! The art director and I had discussed an idea over email, and I had an image in my head, so I painted all of the elements on a separate sheet as well.

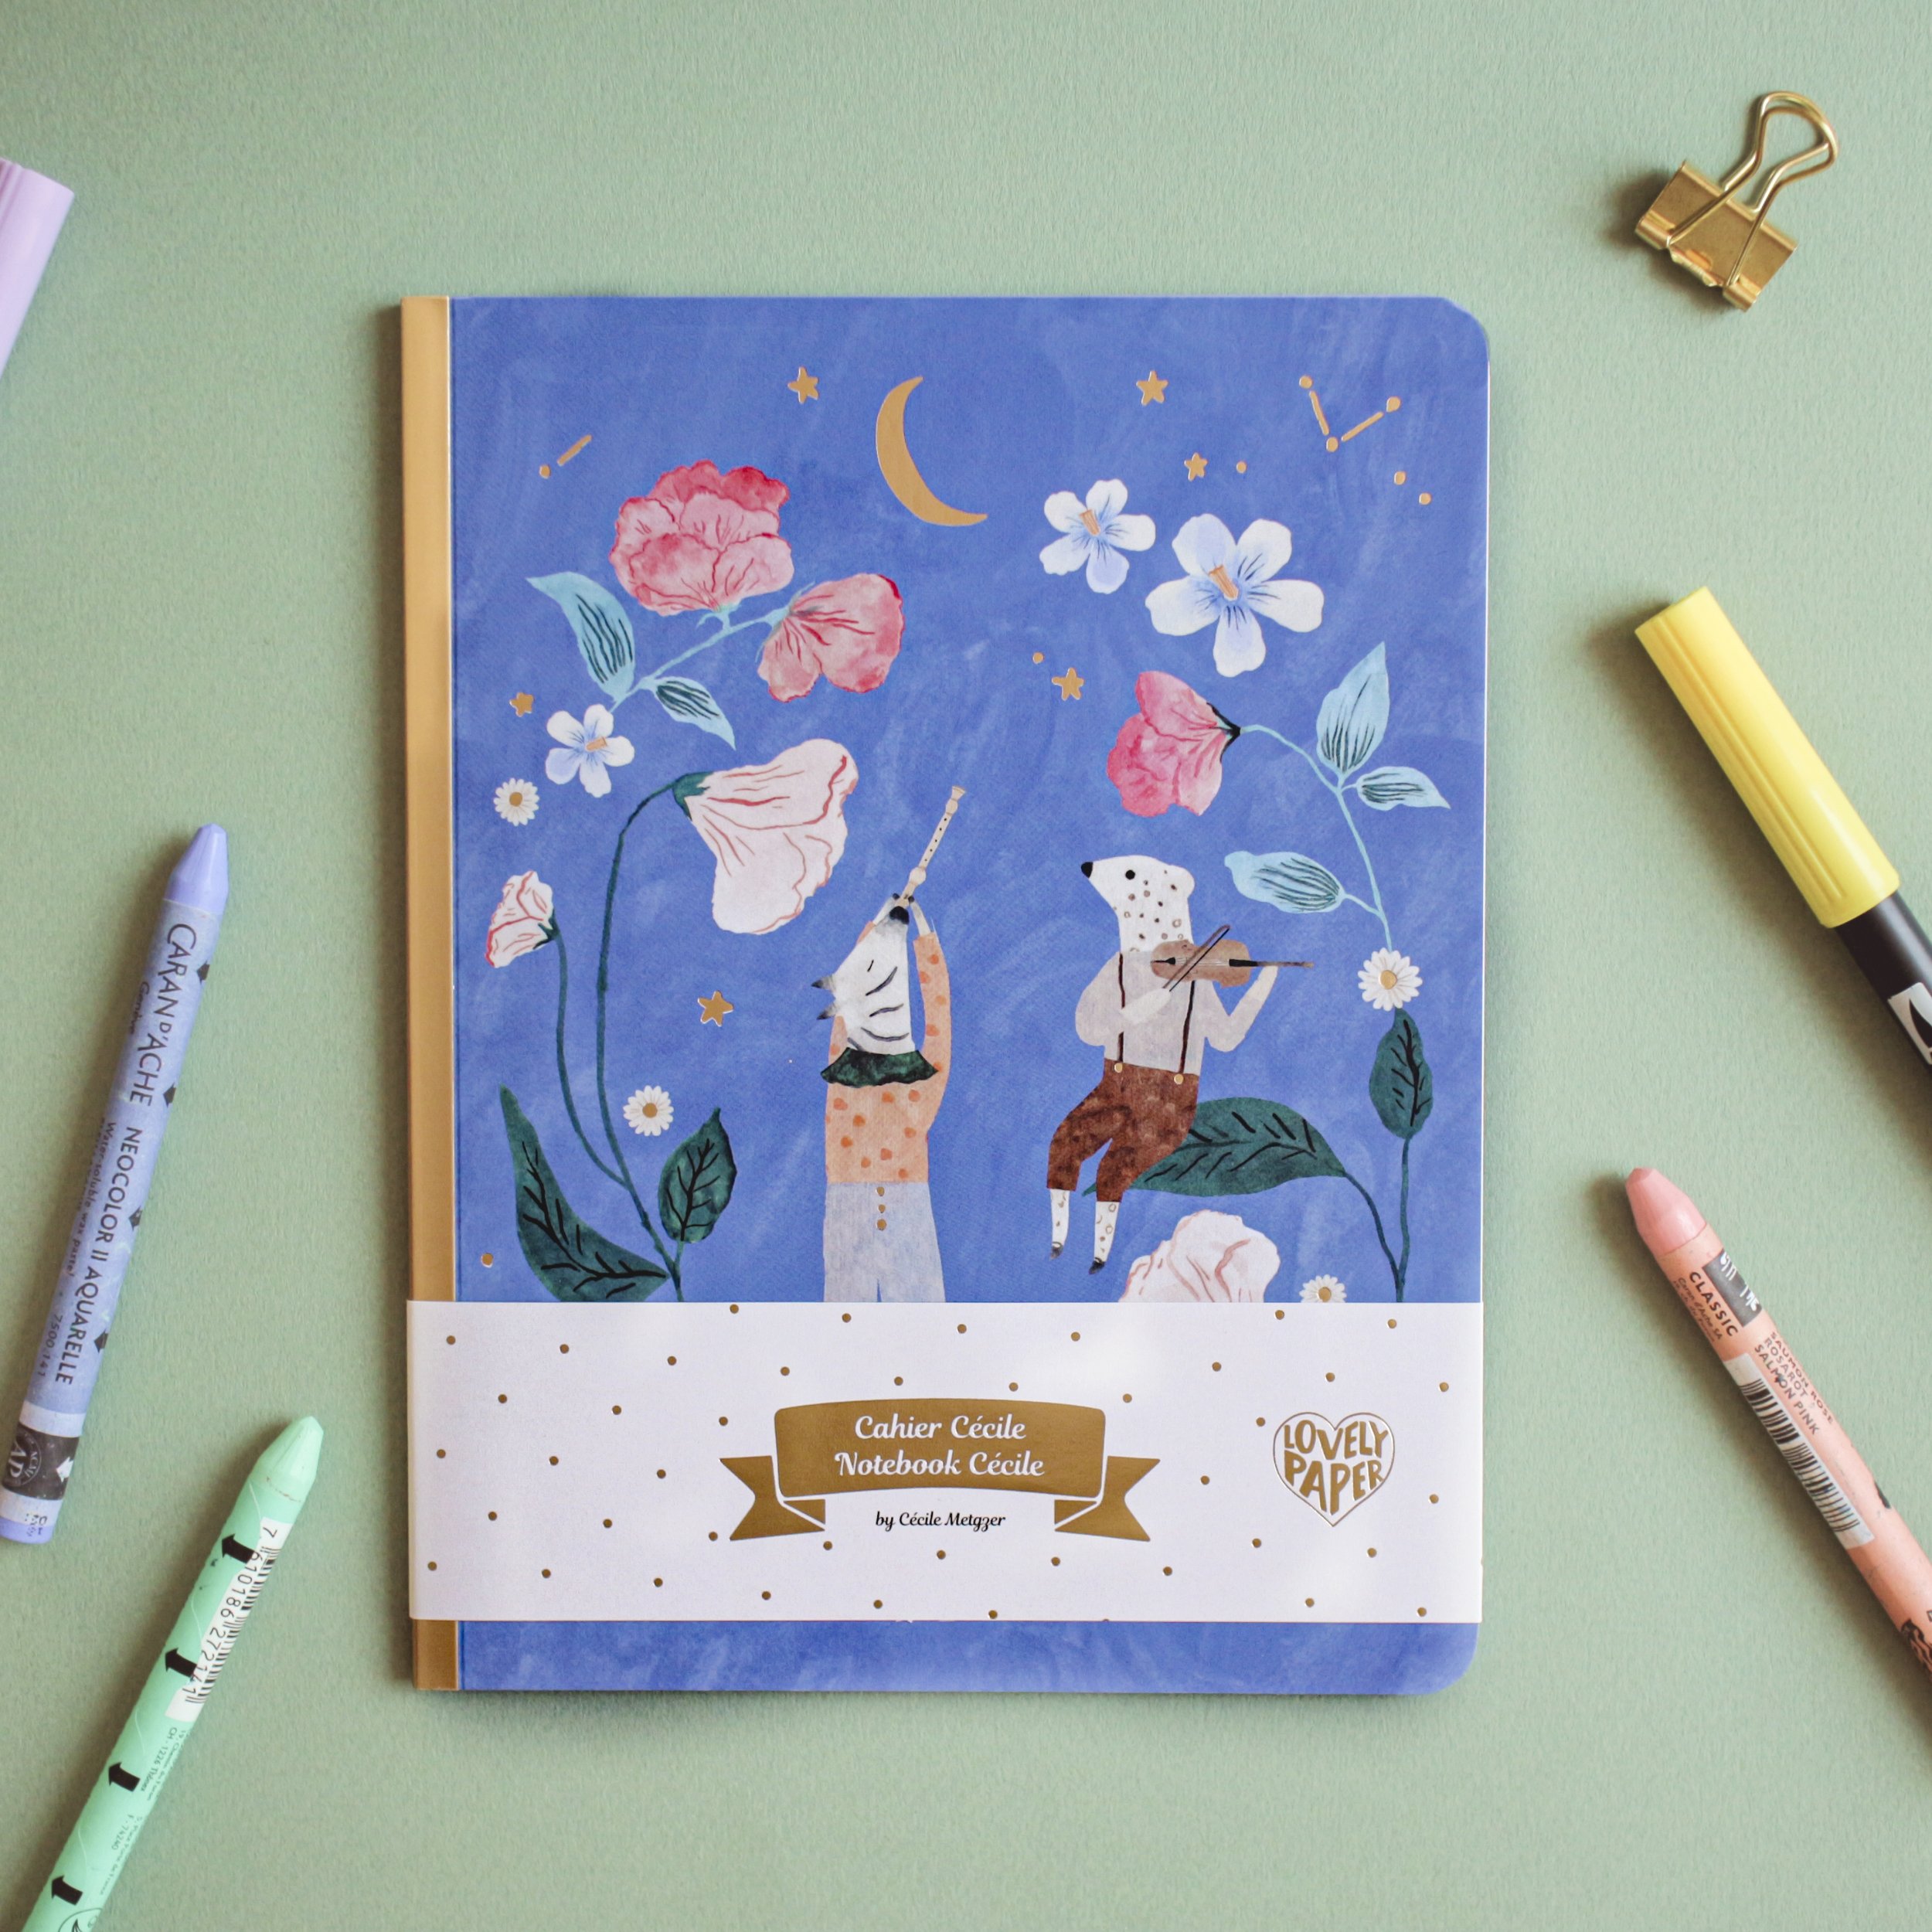
The idea was to have a couple of animal friends sitting on a flowery tree, looking at a starry sky. So I painted the tree in order to have this beautiful painterly texture, some flowers that I would assemble later in order to make the process easier, and the two little characters !
5 - The final designs
After painting everything, all that was left to do was to scan my paintings and create the final compositions in Photoshop.
I always scan my illustrations with the same good old scanner I bought in 2016 : a canon Lide 220. I am still very happy with it and recommend it if you are looking for a nice scanner that is still affordable 😊
Anyway, it was time to import my scanned files into Photoshop and finally start working on the final designs for every notebook ! I am not going to go into too much detail about this digital process here, but I basically separate my painted elements from the white background, clean any dust or imperfection there can be, and then assemble everything following my initial sketches 🙂
I also had to create the repeat tile for my patterns (I painted them in watercolour but cannot seem to find the painting anywhere to show you a photograph of what it looked like !) and create the inside cover designs with them !
Here are the final versions I sent to the art director for approval : (click on each image to enlarge it)


Once again, the final designs of the two small notebooks got approved immediately. However, we had more work waiting for us about the bigger one. Here is the initial design I sent along with the small notebooks :

Although I felt very happy with it, the team at Djeco felt like it did not really fit the aesthetic of the two smaller notebooks. We then changed direction again and came up with something completely different from this, closer to the small notebooks. We decided to turn the two little characters into musicians as well, and include similar flowery composition, so that the three notebooks together would feel like they are a small collection of their own ! I painted some new watercolour elements in order to create the floral composition and the inside pattern :

After that, I once again scanned and assembled everything, and sent it over to the art director and the design team.
So after a few back and forth, here is what the big notebook finally looked like :

And it was finally the end of this notebook adventure ! It was very interesting to see how, amongst the same project, with the same people working all together, some part of the process could go so smoothly and some other parts required much more reflexion, thoughts and back and forths. I learnt a lot through this project, and I am so happy with how everything turned out.
I hope this article has been interesting - I don’t often share my process when working on client projects, but I always find it so helpful and interesting to read it from other artists, so I thought this project was a good opportunity to do it here as well 🥰
Djeco does not sell their papergoods directly, they are only available through stockists. If you want to find them, you can try searching for “Djeco - carnets Cécile” in your web search engine, and hopefully a stockist from your country might appear with them 🌞
Thank you so much for stopping by and being here, it means a lot to me 💙
I have been so talkative already ! So I think it is time to say goodbye and send you all my love.
See you soon for some new adventures 🍵
Cécile